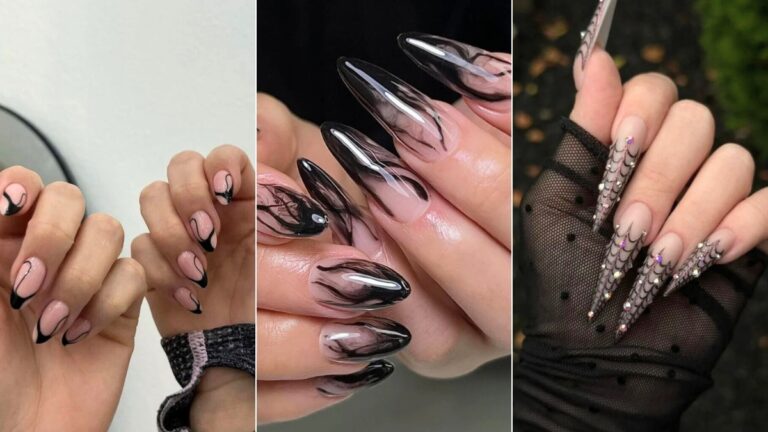
23 Halloween Nail Designs I’d Actually Wear (From Someone Who’s Done the Messy DIY Version)
I have a confession: I once spent $72 on a salon Halloween manicure that started chipping by day four. Four days. For that money, I could have bought a decent gel kit and done three sets myself.
That experience is why I started paying attention to which designs actually hold up, which ones work on short nails, and which ones are worth the splurge versus a $6 sticker sheet.
So here’s what I’ve learned, plus 23 Halloween nail designs for 2025 that cover everything from barely-there spooky to full horror-movie glam.
What’s in this post: Every design below includes the real trade-offs — cost, wear time, difficulty level, and who it’s actually for.
I’ve also got a comparison table for salon vs. DIY vs. press-ons, pro tips for each category, and the FAQ section at the end answers the questions people actually ask me (like “will these work on short nails?” — yes, and I’ll show you exactly how).
Quick note on 2025 trends: Pinterest’s Halloween report shows “Wicked nails” searches up over 1,100% and “Dracula nails” up 187%, so green and deep red are having a serious moment.
That said, the best Halloween nail designs are the ones you’ll actually wear for two weeks, not just October 31st.
The Basics: What Actually Works Before You Pick a Design
Here’s the thing nobody tells you before you book a Halloween manicure: the design matters less than the finish. A simple black polish with a glossy top coat looks more expensive than intricate art that’s already peeling. I learned this the hard way when I tried to freehand tiny ghosts on my own nails with a toothpick. My right hand looked like a crime scene.
The three finishes that photograph best and wear longest:
- Glossy gel — 2 to 3 weeks of wear, costs $35 to $60 at a salon, zero effort at home if you use press-ons
- Matte top coat — makes any color look more editorial, but chips faster on the edges. I get about 5 days before the tips start looking rough
- Chrome or cat-eye — the reflective finish hides small chips better than flat color, which is why it’s worth the extra $10 to $15 at the salon
Pro tip: If you’re doing your own Halloween nails, buy a matte top coat separately. Painting it over a regular glossy manicure instantly makes it look like a $50 salon job. One bottle lasts me two full seasons.
23 Halloween Nail Designs for 2025 (Organized by Vibe)
The “I Have a Meeting at 9am But Also a Party at 8pm” Category
These are for people who want festive without explaining their nails to their boss.
1. Black Glaze Nails
Why it works: It’s just black polish, but the finish does all the work. A high-gloss black reads sleek and intentional instead of “I forgot to take off my costume makeup.”
How to do it: One coat of sheer black, one coat of glossy top coat. That’s it. Stiletto shape if you want drama, short and softly squared if you want something you can type with. A gel set runs about $35 to $50.
The trade-off: Black shows every smudge during application. I’ve ruined more black manis than any other color because I got impatient and touched something before they dried.
Pro tip: Paint your dominant hand first, then your non-dominant hand. Your dominant hand will be steadier for the second round, and you won’t be tempted to “fix” the wet polish on the hand you just finished.
2. Burgundy French Tips with Silver Spiderweb Detailing
Why it works: It’s a French tip, which means it grows out gracefully. The spiderweb is subtle enough that it reads as lace from a distance — a nice detail for anyone who wants Halloween nails for the office.
How to do it: Burgundy base, silver linework spiderwebs drawn over the tips with a striper brush. The professional version takes about 45 minutes at a salon and runs $50 to $75.
The trade-off: Fine linework is genuinely hard to DIY. If you’re doing this at home, use a stamping plate instead of freehand — the lines will be sharper and you won’t want to throw your supplies across the room.
Pro tip: Ask for the spiderwebs only on your ring fingers and thumbs. Full-set webs look busy, and accent nails grow out more invisibly.
3. Smoky Marble Nails
Why it works: No pumpkins, no ghosts, no bats — just layers of charcoal, ash, and milky white swirled together to look like fog. It’s the Halloween nail design for people who hate Halloween nail designs.
How to do it: This is a salon job, realistically. The watercolor marbling technique requires a gel top coat you can manipulate while it’s wet. Expect $55 to $80.
The trade-off: The marble pattern is different on every nail, so if you’re someone who needs symmetry, this will bother you. My friend Dana got this done last October and texted me a photo with “one nail looks like a cloud and one looks like a bruise.” She still wore it for three weeks.
Pro tip: Bring a reference photo. “Smoky marble” means different things to different nail techs — some go more gray, some go more purple. A photo prevents a $70 misunderstanding.
4. Velvet Nails (Magnetic Polish)
Why it works: Velvet nails use magnetic polish to create a glowing, light-catching finish that shifts when you move your hand. No art required — the texture is the whole design.
How to do it: Deep jewel tones work best for Halloween: emerald, garnet, sapphire. A salon gel set is $45 to $65. At home, magnetic polish is trickier than it looks — you need a magnet held over each nail while it cures, and if you move too soon, the effect disappears.
The trade-off: Magnetism fades over time, usually around the 10-day mark. By week two, it’s just regular shimmer.
Pro tip: If you’re doing this at home, cure one nail at a time. I tried doing two at once and ended up with one velvet nail and one that looked like a mood ring.
5. Celestial Gold Nails
Why it works: Tiny moons, stars, and constellations in gold foil or metallic polish. It’s witchy without being literal, and it works on any nail length.
How to do it: Sheer base, gold nail art stickers or freehand dots. The sticker version takes 15 minutes and costs maybe $8 for a sheet that lasts multiple manis. Freehand is a salon job, $55 and up.
The trade-off: Gold foil stickers can lift at the edges if you don’t seal them properly. Press them down firmly and use two coats of top coat over the edges specifically.
Pro tip: Put the constellation design on one hand only and keep the other hand solid. I saw this on a reader’s Instagram (@stephdoesnails) and it makes the set look more intentional.
6. Black Glitter Ombré
Why it works: “Glam, but make it witchy,” as nailsaloon educator Marnae Orton puts it. Black and silver glitter fading from cuticle to tip catches light in a way that flat black doesn’t, and it photographs beautifully.
How to do it: Black base, silver glitter concentrated at the tips, blended upward with a sponge. Salon cost $45 to $65. At home, use a makeup sponge and dab — don’t brush.
The trade-off: Glitter is a nightmare to remove. Soak-off gel is fine, but if you’re using regular polish, budget 20 minutes and a lot of foil for removal.
Pro tip: Ask for the ombré to go the other direction (glitter at the cuticle, black at the tips) if you want the growth to be less obvious. Glitter at the base hides regrowth better.
The “Cute But Slightly Unhinged” Category
For when you want people to look twice.
7. Ghost French Tips
Why it works: A classic French tip with two tiny dot eyes peeking over the edge. It’s cheeky, minimal, and the kind of design that makes strangers ask about your nails at coffee shops.
How to do it: Sheer or nude base, white tips shaped into soft ghost domes, two black dots for eyes. The shape is forgiving — imperfect ghosts still read as ghosts. At home, use a dotting tool (or the end of a bobby pin) for the eyes.
The trade-off: The ghost shape is harder than it looks. Too round and it looks like a cloud, too pointed and it looks like a tooth. My first attempt looked like a sad cashew.
Pro tip: Practice the ghost shape on a piece of plastic wrap before you touch your nails. Paint a few different sizes and see which one fits your nail bed best.
8. Blood Drip Accents
Why it works: One or two accent nails with a glossy red “drip” effect at the cuticle or tip. It’s luxe, a little vampiric, and undeniably spooky without being costume-y.
How to do it: Deep red base on most nails, glossy “dripping” effect on one or two accent fingers. The drip is painted with a thin striper and a steady hand. Salon: $50 to $70.
The trade-off: The drip design grows out in about a week. It’s not a two-week manicure — it’s a weekend manicure.
Pro tip: Put the drip on your ring finger and thumb, not your index finger. Index fingers chip first because you use them for everything.
9. Matte Potion Nails
Why it works: Spooky symbols like potion bottles and snakes on a matte finish. The matte top coat makes the design look like it was printed on, which reads more editorial than glossy cartoon.
How to do it: Nude or pale base, small potion bottle or snake decals, matte top coat. Decals are $5 to $8 for a sheet and take 20 minutes at home.
The trade-off: Matte top coat scuffs. By day three, the edges will look slightly worn. You can refresh with another matte coat, but it adds bulk.
Pro tip: Apply the decals before the matte top coat, then seal with a glossy coat, then finish with matte. The glossy layer underneath protects the decal edges from lifting.
10. Scream Mask Accent Nail
Why it works: For horror fans who want a single statement nail. The Scream mask silhouette on one accent nail, solid black or white on the rest.
How to do it: This is a freehand salon job. The mask needs a steady hand and fine brushes. Expect $60 to $85.
The trade-off: It’s very specific. If you’re not a horror person, it reads as “why is there a weird white blob on your nail.” Know your audience.
Pro tip: Use a matte black base for the other nails. The contrast makes the mask detail pop more than glossy black would.
11. Drippy Green Slime Nails
Why it works: Radioactive green dripping from the tips. It’s fun, it’s a little gross, and it’s exactly the kind of thing that goes viral on TikTok for good reason.
How to do it: Neon or glow-in-the-dark green polish, dripped from the tip toward the cuticle. At home with a dotting tool and a steady hand, or $50 to $65 at a salon.
The trade-off: Neon green stains. Use a base coat — a real one, not the two-in-one stuff. I skipped it once and my nails were tinted yellow for a month.
Pro tip: Mix a tiny bit of white into the green for the drip layer. It makes the slime look thicker and more opaque instead of flat.
12. Cute Mummy Nails
Why it works: This is one of the easiest Halloween nail designs to DIY. Thin white lines wrapped horizontally across a nude or pale base, with two tiny dot eyes. It’s adorable and genuinely hard to mess up.
How to do it: Nude base, white striper lines at slight angles, two black dots. Takes about 10 minutes per hand.
The trade-off: White lines on a nude base can look like you accidentally painted over your cuticles if the lines are too thick. Keep them thin.
Pro tip: Use a fine-tip white nail art pen instead of a brush. The control is better and you can wipe mistakes with a damp Q-tip before they dry.
The “I’m Going Full Witch” Category
For people who treat Halloween as a personality trait, which I respect.
13. Black Lace Nails
Why it works: A delicate web of fine black lines over a sheer nude base. It looks like fabric laid across the nail — gothic but elegant, the kind of thing you can wear to a dinner party without looking like you’re in costume.
How to do it: Sheer nude base, fine black linework in connected loops and scallops. Freehand is a salon job ($65 to $85), stamped lace is faster and more uniform across all ten nails if you have a lace stamping plate.
The trade-off: Freehand lace is organic and custom but requires a very steady hand. Stamped lace is crisp and beginner-friendly but less unique. I’ve done both — stamped for the full set, freehand for one accent nail.
Pro tip: Keep the lace to one or two accent nails. Full lace on all ten fingers looks like a tablecloth.
14. Blood-Drip Mirrored Chrome
Why it works: Mirror-chrome silver nails with glossy red “blood” running from the cuticle. The contrast between cold metal and wet red is what sells it, and it photographs like a film still.
How to do it: Chrome silver base, red drip from the cuticle down. The order matters: chrome first, cure, then the red drip, then a glossy top coat. Salon: $70 to $95.
The trade-off: Chrome shows every ridge in your natural nail. If your nails have any texture, this will amplify it.
Pro tip: Ask for a builder gel base under the chrome. It smooths the nail surface and makes the mirror finish actually look like a mirror.
15. Wicked Green Nails
Why it works: Deep emerald or forest green with a fine glitter or metallic finish. Pinterest searches for “Wicked nails” are up over 1,100% this year, which means you’ll be on trend without trying hard.
How to do it: Two coats of deep green, one coat of fine gold or silver glitter, glossy top coat. Gel holds two to three weeks.
The trade-off: Green polish can make your hands look red if the undertone is wrong. Warm-toned greens (more yellow) flatter most skin tones better than cool-toned greens (more blue).
Pro tip: Swatch the green on a nail before you commit to all ten. Hold your hand next to a white wall in natural light — if the green makes your skin look gray, pick a warmer shade.
16. Haunting Eyes Nails
Why it works: A peeping pair of eyes on a pale pink base. It’s minimal, weird, and the kind of micro nail art that people lean in to look at.
How to do it: Pale pink base, two white dots, two smaller silver dots, black pupils with a fine brush. High-shine top coat. This is doable at home with a dotting tool.
The trade-off: The eyes need to be symmetrical or they look off. Practice on paper first.
Pro tip: Use a toothpick for the silver dots and the pupils. Dotting tools come in sets, but a toothpick gives you the same control for free.
17. Bewjeweled Spider Nails
Why it works: Clear or sheer base, white cobwebs, and small rhinestone “spiders.” The sparkle distracts from the spider, which is helpful if you’re arachnophobic but still want the vibe.
How to do it: Sheer base, white web lines, small black rhinestones for the spider bodies. The rhinestones need to be sealed with builder gel or they’ll pop off. Salon: $60 to $80.
The trade-off: Rhinestones on nails are a commitment. You can’t type normally, you can’t zip your jeans, and you will lose at least one before the week is over.
Pro tip: Put the rhinestones on your non-dominant hand only. Your dominant hand does too much damage.
18. Medieval Fantasy Nails
Why it works: Metallic details and jewel tones — this channels the Renaissance and fairy-core aesthetics that are trending alongside Halloween this year. It’s less “spooky” and more “I’m going to a castle.”
How to do it: Deep jewel tones (sapphire, garnet, amethyst) with gold foil accents. This is a salon design, $65 to $90.
The trade-off: It’s not really a Halloween design — it’s a costume design. If your costume isn’t medieval, these nails will look out of place.
Pro tip: Use gold foil flakes instead of gold polish for the accents. Foil catches light like real metal; polish looks flat.
19. Slime Jelly Nails
Why it works: Translucent slime-green jelly polish that looks squishy and candy-like. It’s alien, gooey, and a little nostalgic — the kind of thing that makes people ask “what is on your nails” in a good way.
How to do it: Jelly green polish, two or three coats for opacity, glossy top coat. Long almond shape amps up the weird-cute factor.
The trade-off: Jelly polish is sheer by nature, so you’ll see your natural nail line through it. If that bothers you, use a milky base coat underneath.
Pro tip: Layer a thin coat of iridescent glitter between the jelly coats. It adds depth without changing the squishy effect.
The “Short Nails, Big Energy” Category
Because you don’t need long nails to do Halloween right. Short nails actually have advantages: less surface area means fewer chances to mess up, and simple designs pack more punch on a smaller canvas.
20. Mini Jack-o’-Lantern Faces
Why it works: Tiny pumpkin faces on one or two accent nails. It’s festive without being overwhelming, and the orange pops against a nude or black base.
How to do it: Nude or black base, orange pumpkin shape, black triangle eyes and a smile. Keep the pumpkin small — if it takes up more than half the nail, it’s too big.
The trade-off: Jack-o’-lantern faces can look childish if the smile is too big. A small, slightly crooked smile reads more grown-up than a wide grin.
Pro tip: Use a dotting tool for the eyes and a toothpick for the smile. The toothpick gives you a thinner, more controlled line.
21. Tiny Bat Tip Accent
Why it works: A single tiny black bat on a milky white base. It’s subtle, it’s cute, and it works on even the shortest nail beds.
How to do it: Milky white base, one small black bat silhouette on one or two accent nails. The bat should be about the size of a sesame seed.
The trade-off: Small bats are hard to see from a distance. If you want people to notice, put the bat on every nail. If you want it to be a secret, keep it on one.
Pro tip: Use a nail art sticker for the bat instead of freehand. It takes 10 seconds and the shape is always perfect.
22. Copper Chrome Stiletto Nails
Why it works: Copper chrome on short stiletto nails. It’s autumnal, it’s metallic, and the warm tone flatters almost every skin tone. Celebrity manicurist Deborah Lippmann calls copper one of the best Halloween-adjacent shades because it works beyond October.
How to do it: Copper chrome powder over a gel base, short stiletto shape. Salon: $50 to $70.
The trade-off: Stiletto shape on short nails means the point is subtle, but you’ll still notice it when you’re trying to pick up coins.
Pro tip: Ask for a rounded stiletto (sometimes called “almond stiletto”) if you want the shape without the point. It’s more practical and still reads as edgy.
23. Orange and Black Half-Moons
Why it works: A half-moon design at the cuticle in orange, black tips. It’s a classic vintage nail shape that reads as Halloween without any motifs at all.
How to do it: Use a hole reinforcement sticker as a guide at the cuticle. Paint the tip black, paint the half-moon orange (or vice versa), peel the sticker. Salon: $40 to $60.
The trade-off: The half-moon sticker method is forgiving, but if the sticker isn’t pressed down flat, polish bleeds underneath. Press firmly and wait 10 seconds before painting.
Pro tip: Do the half-moon in a contrasting color from the tip. Orange cuticle + black tip, or black cuticle + orange tip. Same-color half-moons disappear.
Salon vs. DIY vs. Press-Ons: Which Is Actually Worth It?
Here’s the real talk on cost, wear time, and difficulty for each approach. I’ve done all three, and the right choice depends entirely on how much time and frustration you’re willing to trade for money.
| Salon Gel | DIY Gel/Polish | Press-Ons | |
|---|---|---|---|
| Cost | $50–$95 for detailed art | $15–$30 for supplies (lasts multiple manis) | $8–$20 per set |
| Wear time | 2–3 weeks | 1–2 weeks (regular polish); 2 weeks (gel) | 5–7 days on glue; 1–2 days on tabs |
| Difficulty | None — you sit there | Medium to high, depending on design | Low — 10 minutes |
| Best for | Intricate art, chrome, 3D charms | Solid colors, stickers, French tips | Statement sets you’ll wear once |
| Worst for | Budget, flexibility to change mid-month | Fine linework, freehand portraits | Long-term wear, typing |
The honest answer: For simple designs (solid colors, stickers, French tips), DIY is worth it. For chrome, velvet, or anything with 3D elements, go to a salon. For a single event where you want dramatic nails without commitment, press-ons are the smartest money you’ll spend.
Pro tip: Buy a $10 press-on set as a backup. If your salon appointment falls through or you chip a nail right before a party, press-ons save the night.
What I’d Do First If I Were Starting Over
I’d buy a black gel polish, a matte top coat, and a sheet of Halloween nail stickers. Total: about $25. That combination covers five or six of the designs on this list, and it lets you change your nails every week without another salon appointment.
Then I’d book one salon appointment for the design I can’t do myself — probably the blood-drip chrome or the black lace. Those are the ones where the technique matters, and paying someone who does it every day is worth more than fighting with a striper brush at 11pm.
And I’d skip the elaborate 3D charm sets. They look incredible in photos and terrible in real life when one of the charms catches on your sweater.
Frequently Asked Questions
How long do Halloween nail designs actually last?
Gel designs hold two to three weeks. Regular polish lasts five to seven days before chipping starts. Press-ons on glue get about a week; on adhesive tabs, expect one to two days. Designs with less pattern (solid colors, chrome) grow out more gracefully than intricate art.
Can I do Halloween nail art on short nails?
Yes, and short nails have real advantages: less surface area means fewer mistakes, simpler designs pack more punch, and there’s less chance of smudging while drying. Stick to one or two accent nails and keep the design scaled to less than half the nail.
What’s the best Halloween nail design for beginners?
Mummy nails, half-moon designs, and sticker-based sets are the most forgiving. Anything that uses a straight line or a reinforcement sticker as a guide is easier than freehand curves.
How much should I expect to pay for a Halloween manicure?
Solid colors and simple art: $35 to $60. Detailed gel art with fine linework or chrome: $50 to $95. Acrylic sets with 3D charms: $60 to $120. Press-ons: $8 to $20.
Do I need a base coat for neon or dark Halloween colors?
Yes. Neon green, deep red, and black will stain your natural nails without a base coat. A proper base coat (not a two-in-one) prevents the tint from soaking in. I learned this the hard way with neon green.
What Halloween nail colors are trending for 2025?
Deep burgundy, classic red, forest green, black, and purple. “Wicked” green and “Dracula” red are the specific shades trending on Pinterest this year, with search increases of over 1,100% and 187% respectively.
Are press-on nails good enough for Halloween, or do I need a salon set?
Press-ons are genuinely good now. The glue-on version lasts about a week, which is perfect for a Halloween weekend. The main downside is sizing — most sets come in standard sizes that don’t fit everyone. Look for brands that offer half-sizes or a custom sizing kit.
What’s the best way to remove glitter polish without destroying my nails?
Soak a cotton ball in acetone, place it on the nail, wrap with foil, and wait 10 minutes. Don’t pick or peel. Glitter removal is the one time I actually recommend acetone over gentler removers because gentle removers take forever and you’ll end up picking anyway.

Hi, I’m Ashley Miller, a wife, a busy mom, and someone who loves to share all the things that make life a little more fun and beautiful.
From easy DIY projects, delicious recipes, and chic hairstyles to nail ideas and home decor tips, I share everything I’ve learned and love.
My goal is to inspire other women to explore their creativity and make their homes even more special.