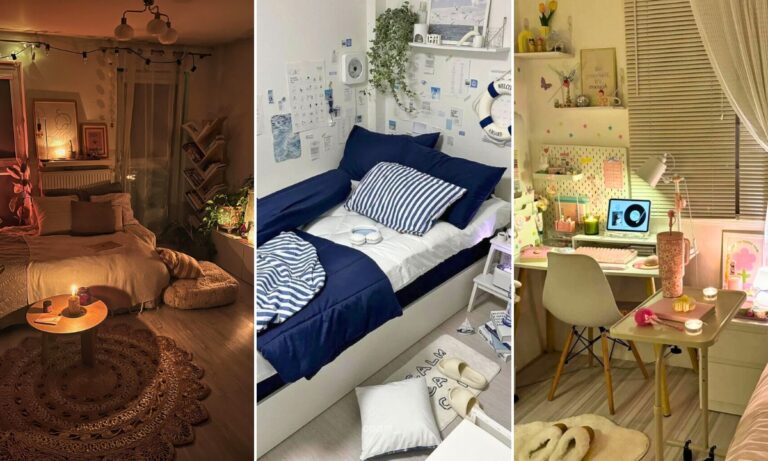
25 Dorm Room Ideas That Actually Survived a Full School Year
I moved in with three throw pillows too many and learned the rest the hard way. Here’s what I’d buy again, what I’d skip, and what nobody tells you about making a 12×14 box feel like a room.
I still remember the first time I walked into my freshman dorm. The bed was against one wall, the desk was against the other, and the closet was roughly the width of a folding chair.
My mom looked at it and said, “Well, it’s… efficient.” I had brought a decorative pillow shaped like a pineapple. It stayed on the bed for exactly four days before it ended up on the floor, where it remained for the rest of the semester.
Here’s the thing about dorm room ideas: most of the ones you see online are styled for a photo, not for a Tuesday night when you’re exhausted, your roommate is on a video call, and you can’t find your charger.
I’ve been through move-in, move-out, and one very regrettable mid-semester rearranging session.
So this isn’t a list of things that look cute. It’s a list of things that actually made the room work — plus a few I’d genuinely tell you to leave at home.
If you’re staring down a tiny room, a shared closet, and a budget that doesn’t stretch as far as the Pinterest board suggests, start here. These are the dorm room ideas I’d use again, in roughly the order I’d buy them.
1. Start with the mattress, not the comforter
The mattress is the one thing in the room you can’t change, and it’s also the thing you’ll spend a third of your life on. I bought a comforter first because it was cute. That was a mistake. The mattress was basically a vinyl-covered brick, and no amount of cute bedding fixed it.
A Twin XL mattress topper runs roughly $30 to $90 depending on thickness and material, and it’s the single highest-impact thing you can buy for a dorm room. I went with a 2-inch memory foam topper and slept noticeably better within a week. My friend Maya went with a 4-inch dual-layer one and said it was almost too soft — she ended up swapping it for a 3-inch after a month. The lesson: thicker isn’t automatically better, and you don’t need to spend $150 to fix a bad mattress.
Pro tip: Buy Twin XL specifically. A regular Twin comforter or sheet set runs about five inches too short and will not fit a standard dorm mattress properly. I watched a girl on my floor wrestle a regular Twin fitted sheet onto her bed for twenty minutes before giving up. Don’t be her.
2. Find out if your bed lofts before you buy risers
Every dorm bed is different. Some schools have adjustable frames with notches that let you raise the mattress to “captain’s height” — roughly 30 to 36 inches of clearance — without any extra hardware. Others offer loft kits you can request. And some beds are fixed at the height they’re at, which means risers are your only option, and only if your housing contract allows them.
I bought a set of plastic risers before I checked, and then found out my bed was already adjustable. The risers went home in a drawer. Before you spend anything, read your housing contract or email your RA. It takes five minutes and saves you from hauling useless plastic up three flights of stairs.
Pro tip: Heavy-duty carbon steel risers can raise a bed more than 20 inches, but standard plastic ones usually only give you enough room for a suitcase or two — not a full storage setup. Measure the clearance you actually need before you buy.
3. Under-bed storage that rolls (and doesn’t fight you at 7 a.m.)
Under-bed space is the largest uninterrupted storage volume in a dorm room, and most people waste it on bins they have to drag across the floor. I started with basic lidded plastic bins. They worked, but every time I needed something from the one in the back, I had to pull everything out and pile it on my bed. By November I’d stopped using the back bins entirely.
Wheeled under-bed drawers or bins solved that. You pull one out, grab what you need, and push it back. The trade-off is cost and floor clearance — wheels add height, and if your bed is low, they won’t fit. Here’s a rough comparison of what’s out there:
| Type | Typical cost | Best for | Trade-off |
|---|---|---|---|
| Basic lidded plastic bin | $10–$25 | Seasonal clothes, extra bedding | Hard to access if stacked; cracks over time |
| Wheeled under-bed drawer/bin | $25–$45 | Everyday items you need to reach | Needs more clearance; wheels can scratch floors |
| Collapsible fabric box with lid | $15–$35 | Soft items, moving in and out | Less structure; doesn’t stack well |
| Vacuum storage bag | $10–$20 for a set | Out-of-season clothes and bedding | Not for daily use; can damage delicate fabrics if over-packed |
| Repurposed dresser drawers on wheels (DIY) | Nearly free if you have scrap materials | Budget setups with a specific height | Takes time; needs basic tools |
I eventually landed on two wheeled bins — one for snacks and toiletries, one for extra clothes — plus a vacuum bag for my winter coat. That combination handled 90% of my under-bed clutter.
Pro tip: If you’re buying bins before move-in, don’t guess the height. Measure your bed frame at home, or wait until you’re in the room. I bought bins that were two inches too tall and had to return them during the busiest week of the semester.
4. Twin XL sheets that can survive a shared laundry room
Dorm laundry is not gentle. The machines are industrial, the cycles are long, and your sheets are in there with someone’s towel that has been waiting since September. Cheap cotton-poly blends pill and thin out fast. I went through one $25 set that felt like sandpaper by October.
A Twin XL sheet set runs roughly $25 to $70, and this is one of the few places where spending a little more actually pays off. Bamboo viscose or a higher-thread-count cotton set holds up better to repeated washing and feels cooler, which matters in a room with no central air and one window that opens four inches. I’m not saying you need $70 sheets. I’m saying the $25 set is not the bargain it looks like.
Pro tip: Buy a mattress protector and topper straps at the same time. They’re $10 to $25 each and they prevent the two most common dorm bedding annoyances: a stained mattress you can’t clean and a topper that slides off the bed every night.
5. A fabric headboard that comes down in May
Dorm walls are usually some variation of off-white cinderblock, and the bed is the biggest visual anchor in the room. A fabric headboard makes the bed look intentional instead of institutional. The problem is most headboards require drilling, which is a non-starter.
The workaround is a fabric panel or a lightweight upholstered headboard hung with heavy-duty adhesive strips or a tension rod. I used a quilted fabric panel that attached with command strips and came off clean at the end of the year. My roommate used a tapestry folded over a tension rod between two walls — it looked softer and cost about $20. Both worked. Neither left a mark.
Pro tip: Whatever you hang above the bed, check the weight rating on your adhesive strips and add a little buffer. A 5-pound headboard on 5-pound strips is a gamble. I used strips rated for 8 pounds and never had a problem.
6. A hanging closet organizer, because dorm closets are a suggestion
My closet was 22 inches wide. I measured it. A hanging closet organizer with four or five shelves turned that 22 inches into something I could actually use — folded clothes on the shelves, shoes on the bottom, smaller items in the side pockets. It cost about $15 to $20 and took ten minutes to hang.
The mistake people make is overloading it. Fabric organizers have a weight limit, and hanging one from a flimsy closet rod with every pair of jeans you own is how you end up with a sagging organizer and a bent rod. I kept heavy items on the floor of the closet and used the organizer for shirts, sweaters, and accessories.
Pro tip: Hang the organizer before you put clothes in it, and check that the rod is actually secured. In older dorms, closet rods are sometimes held up by brackets that have been there since 1987. Give it a gentle tug first.
7. An over-the-door organizer (with a weight reality check)
Over-the-door organizers are everywhere in dorm content, and they do work — for the right things. I used one on the back of my closet door for shoes and cleaning supplies. It held up fine. My friend put one on her main room door with books and a hair dryer in it, and the door stopped closing properly within a month.
The weight limit matters more than the organizer itself. A standard over-door organizer can hold around 40 pounds if it’s well made and the door is solid, but cheap ones with thin hooks bend. If you’re hanging heavy items, put them on the closet door or use a freestanding rack instead.
Pro tip: Put the heaviest items at the bottom of the organizer, not the top. It sounds obvious, but the top pockets are the easiest to reach, so that’s where everyone puts everything. Resist.
8. A collapsible laundry hamper that fits under the bed
A rigid laundry basket takes up floor space even when it’s empty. A collapsible hamper folds flat to about an inch and a half and slides under the bed or into the closet when you’re not using it. I had a pop-up mesh one that cost under $15 and lasted all four years.
The trade-off is that collapsible hampers don’t stand up as well when empty, and the mesh ones can tear if you overstuff them. I kept a separate small bin for delicates and washed the hamper itself once a month.
Pro tip: Get one with handles you can carry on your shoulder. Dorm laundry rooms are often in the basement or at the end of a long hallway, and a hamper without decent handles is a bad time.
9. Stackable pull-out bins for shelves and closet floors
Dorm storage is often shelves you can’t see into and floor space you can’t reach. Stackable pull-out bins bridge that gap. I used a five-pack of stackable bins that worked out to about $7 each, and they were the most versatile thing I bought. I used them for snacks, hair products, pens, and the random cables that accumulate in every dorm room.
The catch is height. When stacked, each bin only gives you about 6 inches of usable space, so anything taller than that needs to go in the top bin or somewhere else. I learned that the hard way with a bottle of mouthwash.
Pro tip: Label the front of each bin with a strip of washi tape and a marker. It sounds overly organized, but it stops the “where did I put the extra phone charger” spiral at 11 p.m.
10. Vacuum bags for the clothes you won’t wear until November
I brought my entire winter wardrobe to school in August. It took up half my closet and I didn’t touch any of it for three months. Vacuum storage bags compressed my coats and sweaters to a third of their size and slid under the bed. When the temperature dropped, I opened the bag and everything was fine.
The caveat: vacuum bags are not for daily-use items, and over-packing them can crease delicate fabrics or damage zippers. I wouldn’t put a nice blazer in one. For hoodies, coats, and extra bedding, they’re hard to beat.
Pro tip: Don’t vacuum all the air out of a bag holding anything with structure — like a structured coat or a hat with a brim. Use a lower compression setting or skip the bag entirely for those.
11. The clear-centre desk rule
My desk was a dumping ground for the first month of school. Snacks, mail, a hairbrush, three notebooks, and a water bottle — all fighting for the same 36 inches. The fix was embarrassingly simple: keep the centre of the desk clear for whatever you’re actively working on, and move everything else to the edges or a shelf.
The clear-centre rule means the laptop or notebook sits in the middle, one current textbook or folder goes to the side, and everything else — pens, chargers, skincare — lives in one tray or cup in the back corner. It sounds rigid, but it’s the difference between sitting down to study and sitting down to move clutter out of the way first.
Pro tip: Put your lamp on the opposite side of your writing hand. If you’re right-handed, the lamp goes on the left, so your notes aren’t in shadow while you write. I didn’t figure this out until sophomore year, and I’m still annoyed about it.
12. A pegboard above the desk
A pegboard is one of those dorm room ideas that looks like it requires a DIY skill level you don’t have, but it doesn’t. An IKEA SKÅDIS pegboard or a similar lightweight board hangs with adhesive strips or a few command hooks, and it gets small items off the desk without adding a shelf that blocks your light.
I used mine for headphones, keys, a small mirror, and a few photos. The trade-off is that pegboard accessories add up — hooks, containers, and shelves are sold separately, and a fully kitted-out board can cost $40 to $60 if you’re not careful. Start with the board and a pack of mixed hooks, and add as you go.
Pro tip: Mount the pegboard high enough that your laptop screen doesn’t hit it when you tilt it back. I measured wrong the first time and had to move the whole thing down two inches.
13. A clip-on task lamp that doesn’t need a drill
Dorm overhead lighting is universally terrible — cool, flat, and designed for a classroom, not a bedroom. A clip-on lamp solves two problems at once: it gives you focused light for studying, and it doesn’t require any installation beyond clipping onto a desk edge or shelf.
I used a $20 clip-on LED lamp for three years. It wasn’t pretty, but it was adjustable, it didn’t take up desk space, and it didn’t need an outlet near the desk. The clamp left a small indentation on the desk edge, which I covered with a piece of felt at the end of the year.
Pro tip: Look for a clip-on lamp with a warm-to-cool adjustable colour temperature. Cool light for studying, warm light for winding down. A single-brightness lamp is cheaper, but you’ll use it less.
14. Cable parking (yes, this is a real idea)
Every cable in a dorm room wants to live on the floor, behind the desk, or tangled around a chair leg. Cable clips are cheap, removable, and stop the mess before it starts. I stuck a row of clips along the back edge of my desk and ran my charger, laptop cable, and lamp cord through them. Nothing fell behind the desk for the rest of the year.
The total cost was under $10. The trade-off is that adhesive clips don’t stick well to dusty or textured surfaces — clean the desk edge with a wipe first and let it dry completely before sticking anything on.
Pro tip: Only leave out the cables you use every day. The rest go in a labeled bin. A desk with one charger and one laptop cable looks intentional. A desk with six cables looks like a Best Buy display that gave up.
15. Layer your lighting below eye level
The single most transformative thing I did for my dorm room wasn’t decor — it was lighting. The overhead panel flattens everything and makes the room feel like a hallway after dark. Adding two or three small light sources below eye level — a desk lamp, a clip-on reading light, a small lamp on a shelf — gives the room depth and makes it feel warmer.
The trick is to spread them out. If all your light is on one side of the room, the other side stays dim and cave-like. I put a desk lamp on one side, a small lamp on my dresser on the other, and a clip-on light on my bed frame. Three sources, maybe $45 total, and the room felt completely different.
Pro tip: Pay attention to colour temperature. Anything under roughly 2700K reads as warm lamplight and helps your body wind down. Most dorm overhead panels are above 4000K, which is why the room feels like a corridor at night.
16. A plug-in pendant or adhesive ceiling hook (no drilling)
If you want overhead light that isn’t the panel, a plug-in pendant is the renter-friendly answer. You hang it from a heavy-duty adhesive ceiling hook rated for more than the fixture’s weight, plug it into a wall outlet, and you’re done. No electrician, no drilling, no housing violation.
I didn’t try this until junior year, and I wish I’d done it sooner. A simple paper or fabric pendant softened the whole room. The caveat is that you need an outlet near the ceiling hook, or an extension cord rated for the fixture — and some schools ban extension cords entirely. Check your housing rules before you buy.
Pro tip: Weigh the pendant before you hang it, and use a hook rated for at least double that weight. Adhesive hooks fail more often from underestimating the load than from bad installation.
17. Fairy lights with a remote and timer
Fairy lights are the most basic dorm room idea on this list, and I’m including them because the version with a remote and timer is genuinely different from the plug-in string you had in middle school. Battery-operated lights with a timer turn on at dusk and off a few hours later, so you come back to a lit room without leaving them running all day.
I wrapped a string around my headboard and another along the top of my desk. They gave the room a soft glow without competing with my roommate’s side. The batteries lasted about six weeks with daily use, and I bought rechargeable ones after the first month.
Pro tip: Don’t hang fairy lights directly above your bed if you tend to fall asleep with them on. LEDs run cool, but the adhesive clip can still fail, and waking up with a string of lights on your face is not the vibe.
18. A command strip gallery wall (with the one rule everyone gets wrong)
Command strips are the backbone of dorm wall decor, and the one rule that matters is this: pull the strip down, parallel to the wall, not out. I watched a girl in my building rip a strip straight off the wall and take a chunk of paint with it. She lost her deposit. The strip itself is designed to release when you stretch it downward.
I hung a gallery wall of lightweight prints and photos with command strips and mini hooks. Total cost was maybe $25 including the strips. Everything came down in May without a single mark. The trade-off is that command strips have weight limits, and heavy frames or mirrors need the picture-hanging strips, not the basic hooks.
Pro tip: Clean the wall with rubbing alcohol and let it dry before sticking anything up. Dust and cinderblock texture are the two biggest reasons command strips fail. Also, press the strip firmly for 30 seconds — not a quick tap.
19. Peel-and-stick wallpaper for one accent wall
Dorm decor searches for wallpaper spiked this year — hydrangea was the top-searched pattern — and peel-and-stick wallpaper is the reason. You can cover one wall or even just the back of a bookshelf, and it peels off at the end of the year. It’s the fastest way to make cinderblock feel less like cinderblock.
The caveat is that not all peel-and-stick wallpaper is actually removable, and cheap versions can take paint with them. I tested a small square in a corner first and left it for two weeks before committing to a full wall. The good news is that a single accent wall in a dorm room doesn’t take much — one or two rolls is usually enough.
Pro tip: Buy one extra roll. Pattern matching eats more paper than you think, and running out halfway through a wall is a special kind of frustration.
20. A tapestry or fabric panel for softness
A tapestry does two things at once: it covers a large blank wall and it softens the room’s acoustics. Dorm rooms are echoey — hard floors, hard walls, hard furniture — and fabric absorbs some of that. I hung a lightweight tapestry with command hooks and binder clips, and it made the room feel less like a box.
The trade-off is that tapestries collect dust, and a cheap one can look thin and shiny under dorm lighting. Look for a cotton or cotton-blend tapestry rather than polyester if you can. I washed mine once a semester in cold water on a gentle cycle and hung it to dry.
Pro tip: Iron or steam the tapestry before you hang it. The fold lines from shipping take months to fall out on their own, and they’re the main reason tapestries look cheaper than they are.
21. A washable rug that’s the right size
Dorm floors are either cold tile or industrial carpet that’s been there since the building opened. A rug makes the room feel warmer and defines the space. The mistake is buying a rug that’s too big or too expensive for a room you’ll leave in nine months.
For a tight dorm room, a 3×5 or 4×6 rug works as a bedside or centre-of-the-room piece. A washable rug in the $40 to $80 range is the sweet spot — it survives spills, it’s easy to clean, and you won’t be heartbroken when it gets a mystery stain in February. I bought a $40 washable rug freshman year and it lasted all four years.
Pro tip: Put a rug gripper underneath. Dorm floors are often slick, and a rug that slides when you step on it is a trip hazard in a room where you’re already navigating around a bed and a desk.
22. A real plant (or a fake one, if you’re honest with yourself)
A plant makes a dorm room feel alive in a way that no amount of throw pillows can. The problem is that dorm rooms are terrible for plants: inconsistent light, dry air from the heating system, and long stretches where you forget to water anything because you’re overwhelmed by midterms.
A pothos or a snake plant is about as close to unkillable as it gets. If you know you’re not going to water something, a good fake plant is fine — I had a fake fern for two years and nobody ever knew. The trade-off is that fake plants collect dust, so rinse them in the sink once a month.
Pro tip: Put the plant near the window but not directly against the glass. Dorm windows can get extremely hot in the afternoon, and a plant pressed against the pane will cook.
23. Directional lighting for your roommate’s sake
If you share a room, lighting is a shared resource whether you plan for it or not. A bright overhead panel at midnight is a roommate conflict waiting to happen. Directional light — a clip-on reading light, a small lamp angled at your desk, a string of lights along your bed frame — keeps the light on your side of the room and lets the other half stay dark.
My roommate and I had completely different sleep schedules. The clip-on light on my bed frame was the only reason we didn’t argue about the overhead light every night. It cost $15 and solved a problem that no amount of “being considerate” was going to solve.
Pro tip: Agree on a “lights down” time with your roommate in the first week, before either of you is annoyed. It’s easier to set a rule when you’re both still being polite.
24. A shared command centre by the door
A small wall-mounted command centre — a dry-erase calendar, a corkboard, a hook for keys — sounds like something your mom would suggest. It also works. Dorm rooms are small enough that the door becomes the default drop zone, and without a designated spot, keys, mail, and lanyards end up on the desk or the floor.
I used a small dry-erase calendar and two command hooks by the door. My roommate and I wrote our schedules on it, and we stopped asking each other “where are you going” every time someone left the room. Total cost was under $20.
Pro tip: Put the calendar at eye level, not above the door. If you have to stand on your toes to read it, you’ll stop using it within two weeks.
25. What I’d actually skip: the coffee maker, the mini-fridge rental, and the pillow mountain
I bought a coffee maker freshman year. I used it twice. The campus coffee shop was closer than the communal kitchen, and I didn’t want to deal with pods and milk and washing a mug in a bathroom sink. A mini-fridge can be pricey and a pain to store over summer — renting one from the school is often the smarter move if you really need one.
And the throw pillows. I brought four. I used one. The rest lived on the floor or in the closet. Decorative pillows are the most common dorm over-purchase because they’re cute and cheap, but they take up bed space and collect dust. Bring one or two that you actually lean against, and leave the pineapple at home.
Pro tip: Before you buy anything for a dorm room, ask yourself: “Will I use this weekly, or will I move it out of the way daily?” If it’s the second one, skip it. That rule saved me from a lap desk, an ironing board, and a decorative ladder shelf that would have fallen over the first time someone bumped it.
The dorm room ideas that actually matter (a short, honest wrap-up)
If I were starting over in a 12×14 dorm room tomorrow, I’d spend my first $150 on three things: a Twin XL mattress topper, a set of sheets that can survive the laundry room, and two or three small light sources. Those are the things you use every single day, and they’re the things that make the room feel less like a holding cell and more like a place you can actually rest.
Everything else — the gallery wall, the pegboard, the rug — is icing. Nice icing, and worth doing once you’ve handled the basics. But don’t buy the icing first. I did, and I spent the first month of college sleeping on a brick and reading under a light that made my eyes hurt.
The best dorm room ideas aren’t the ones that photograph well. They’re the ones that make a tiny, shared, temporary space feel like yours for the nine months you’re in it.
FAQs
What’s the single most important thing to buy for a dorm room?
A mattress topper. You can’t change the mattress, and you’ll spend a third of your time on it. A $30–$90 Twin XL topper makes a bigger difference than any decor purchase.
Do I really need Twin XL bedding, or will regular Twin work?
Twin XL. Regular Twin sheets and comforters run about five inches too short and won’t fit a standard dorm mattress properly. Returning the wrong size later costs more than getting it right once.
How much should I budget for dorm room decor and bedding?
The average family plans to spend around $194 on dorm furnishings, but a solid complete bedding setup alone runs about $120 to $300 depending on quality. Prioritise the mattress, sheets, and lighting before decor.
Can I hang things on dorm walls without losing my deposit?
Yes — use command strips and adhesive hooks, and pull the strips down parallel to the wall when you remove them, not out. Clean the wall first and don’t exceed the weight rating. I hung a full gallery wall and a tapestry and left zero marks.
Are bed risers always allowed?
No. Some schools allow them, some don’t, and some beds are adjustable or loftable without risers. Check your housing contract or ask your RA before buying anything.
What’s the biggest dorm room mistake people make?
Buying decor before solving storage and sleep. Throw pillows and wall art are fun, but they don’t fix a bad mattress, a dark desk, or a closet that doesn’t close. Start with the things you use daily, then decorate.

Hi, I’m Ashley Miller, a wife, a busy mom, and someone who loves to share all the things that make life a little more fun and beautiful.
From easy DIY projects, delicious recipes, and chic hairstyles to nail ideas and home decor tips, I share everything I’ve learned and love.
My goal is to inspire other women to explore their creativity and make their homes even more special.